
Tutorial
Begin the game after you have created your character. You can start the tutorial by double tapping “Yes” in the tutorial options.
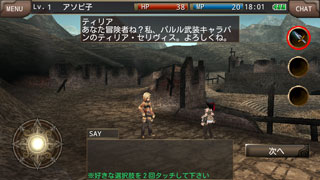
First let’s take control by following Tilia’s instructions.
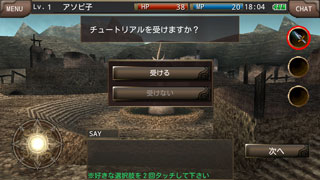
If this is the first time to play Iruna, we recommend you to take the tutorial.
You can learn how to battle, cure, and talk to NPCs by following Tilia’s instructions.
Chat
When you flick the “Chat”![]() button to the left located in the top right side of the screen, each of the buttons in chat mode will show up.
You can switch to each of the chat modes by touching the buttons shown from the “chat” button.
button to the left located in the top right side of the screen, each of the buttons in chat mode will show up.
You can switch to each of the chat modes by touching the buttons shown from the “chat” button.
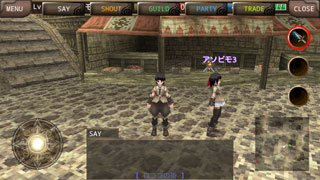
“SAY”

“SHOUT”

“PARTY”

“GUILD”

“Trade”

Please chat with good manners.
* Please refrain from using light conversations in shout as logs will be shown up to all of the players in the map. Use shout when you are looking for party members or when stuck in a quest and need some help.
Posts
Posts are functions to send messages to a certain individual.
There are two ways to create a message.
*If the recipient is a party, friend, or guild member
Tap the screen in the following order
MENU>community>post>write a letter
the create a message screen will show up.
*If the recipient is not a party, friend, or guild member
Tap the screen in the following order
MENU>community>target>choose the players name>write a letter
the create a message screen will show up.
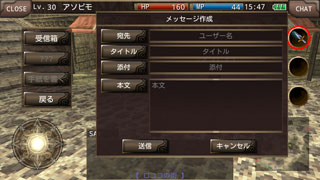
When you tap the “To” button, the party, friend, guild list will show up and you can choose the player to send a message to. If you open the create a message screen from the following order,
target>choose the players name>write a letter
the name of the recipient will show up automatically.
When you tap the “Title” button, the title input screen will show up.
The letters written will show up in the “Inbox” as the title.
When you tap the “Body” button, the body input screen will show up.
The letters written will show up when the recipient opens the message in the “Inbox”.
When you tap the “Send” button, the conformation screen will show up and the message will be sent when you choose “Yes”.
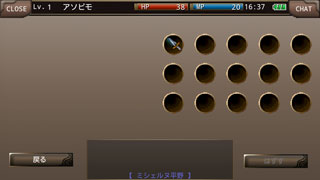
Emotion
Emotions represent “expressing emotions”. When using emotions, the characters will perform actions such as “Sit”, “Happy”, and “Nod”.
Tap the screen in the following order
MENU>settings>shortcut
You can set emotions from the emotions list by tapping the shortcut buttons that are free.


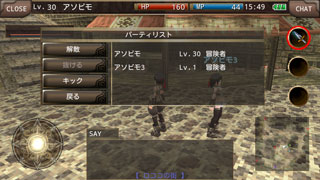
Party
Parties are small groups created from four players at the maximum.
When teamed up, all party members can lock on to the same enemy, so players will be able to defeat powerful enemies by the synergy effect of cooperation that cannot be defeated alone.
Please check below for specific directions to create and dismiss parties.
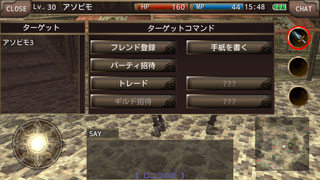
1. Tap the screen in the following order.
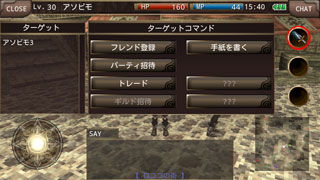
MENU>community>choose the player from target> invite to party
2. Wait for an approval from the recipient player
3. The recipient player will choose “Yes” when the dialog of the approval is shown.
1. Tap the screen in the following order
MENU>community>party
2. Choose “Dismiss”
1. Tap the screen in the following order
MENU>community>party
2. Choose “Leave”
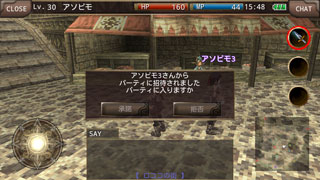
You will be asked to join a party when you are requested to one.
Choose “Yes” if you want to join a party.
* There is no function in ”Android(TM)” of transferring the leaders authority automatically.
Guilds
Guilds are a group of players leaded by the master that can hold up to 100 players at the maximum.
Conversations can be made to the members in “Guild chat”.
Broader relationships can be made from belonging to a guild.
The big difference between “Guilds” and “Parties” is that some conditions need to be cleared in order to create a guild.
Players who wish to create a guild should visit the bars such as “Lunar Guardian” located in the “Rokoko city” in the game or other bars scattered in several areas.
When you create a guild, you will be able to name your guild and the character who built the guild will be the master.
Invitations to guilds can be done by the master, officer, or other members who have the authority.
The master and officer can update the “Notification” functions in the guild.
*When the master leaves the guild, the officer will preferentially receive the authority of the master.
* There are no functions such as “Guild level” or “Guild skill” in ”Android(TM)” .
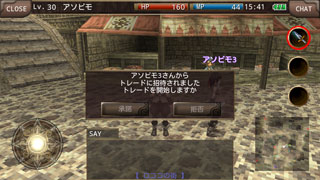
Trade
The trade function is a system where players can exchange, buy and sell items or Supinas.
Tap the screen in the following order
MENU>community>choose the player from target> trade
*You cannot request a trade to a stranger. Only request a trade to characters participating in the character party of the friends registered.
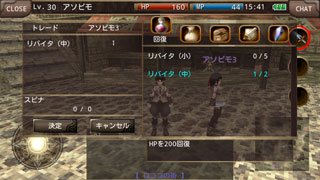
Choose the item or Supina to trade.
Choose the number of items and Supinas by “-“ and ”+”(You can directly input the numbers by tapping the numbers).
Tap the “Confirm” button and verify the items or Supinas.
Wait for the other player to finish.
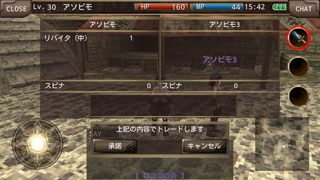
Verify yours and other players items and Supinas.
If there is no problem tap the agree button. Wait for an approval from the other player.
If the “The trade is approved” is shown in the chat window the trade is finished.
When verifying the traded item, you can switch the explanation column screen by tapping on the cursor of the item you want to verify in the explanation column.
The explanation column is divided into two pages, the item explanations page and the abilities and restrictions information page.
*Be aware of trade frauds.
*Be careful with the digits of the items and Supinas when trading.
*The trade will be canceled if there is less space open than the number of items receiving.
*The trade will be canceled if the number of Supinas receiving exceeds the limit of Supinas that can be hold.
*The trade will be canceled if there are no actions taken for a certain period of time.