▼About "Expand Storage"
■Question
What is the Expand Storage?
◆Answer
You can purchase "Expand Storage" at the Item Shop.
By purchasing ""Expand Storage 10" your storage will automatically expand by 10.
You will not receive the expansion as an item.
*For your first time Storage A will upgrade from 30 to 40.
*You can upgrade one storage to hold up to 100.
*After reaching the expansion limit you will not be able to purchase any more expansions.
▼About Equipment Synthesis
■Question
About Equipment Synthesis
◆Answer
- About Equipment Synthesis -
*The Star symbol will be shown in the game instead of the word "Star".
You can level up the Star Ability level on the equipment or transfer the ability to another equipment by Equipment Synthesis.
You can use this feature from menu > Character > Production > Upgrade Star Ability / Attach Star Ability
*There are no skill levels and EXP for Equipment Synthesis unlike other productions.
*Equipment Synthesis requires "Synthesis Kit". "Synthesis Kit" can be purchased at the general stores in the game.
- The places where you can buy Synthesis Kit -
- Rokoko Mines
- Capital city Sofya
- Capital city Saterica
- Capital city Elban
- Minaula City
- Port Spargas
- Drafbourg
- Wind Ark
- Upgrading Star Abilities -
1: Tap Menu > Character > Production > Upgrade Star Ability from the upper left of the screen.
*"Synthesis Kit" is required to synthesize equipment.
2: Select the main item to upgrade.
*You cannot select Avatar(Body) and Avatar(Additional).
*You cannot select the item that has Star Ability Lv5.
*Only the items that have Star Ability can be selected.
*You can select the equipped items as long as they have Star Ability.
3: Select the material.
*There are some conditions for the materials.
Condition 1: Avatar(Body) and Avatar(Additional) cannot be selected.
Condition 2: The Star Ability on the material should be the same type and level as the main item.
Condition 3: The main item and material have to be the same category such as Sword, Bow, Rod, Claw, Armor, Additional Gear and Special.
Condition 4: Equipped items cannot be selected.
Example 1: If you set "Dielita" that has Star Vitality Lv1 as the main item, you can use "Dielita" that has Star Vitality Lv1 as the material.
Example 2: If you set "Iron Armor" that has Star Vitality Lv1 as the main item, you cannot use "Twin Ribbon" as the material even if it has Star Vitality Lv1.
4: The result and success rate will be displayed.
*The result shows the Star Ability that will be attached after succeeding in the synthesis.
*The success rate varies according to the quality of items and the Star Ability Lv.
*The quality of weapons and armors is decided with ATK and DEF. The quality is higher as ATK and DEF are higher.
5: Select support items.
*You can synthesize without support items.
*The types and effects of support items vary in Upgrading Star Ability and Attaching Star Ability.
*There are 3 types of support items: "Success Rate Up", "Quality Degrade Rate Down" and "Ability Degrade Rate Down".
*"The selected support item" and "The support effect" will be displayed alternately in the support item section after you select the support item.
6: Tap "Synthesize" and "Yes" if the selected items are correct.
7: Star Ability will be leveled up when you succeed in synthesis.
*The materials for the synthesis will disappear when you succeed in synthesis.
*If you fail in synthesis, the material will not disappear but the quality of the main item will be lowered and occasionally Star Ability level will also be lowered.
*The quality will not be lowered if ATK and DEF of the items are the basic value(Quality: 0).
*Star Ability will not be lowered if the Star Ability is Lv1.
- Attaching Star Ability -
You can transfer Star Ability to the equipment that doesn't have Star Ability.
Also, you can overwrite Star Ability on the equipment that already has Star Ability.
1: Tap Menu > Character > Production > Attach Star Ability from the upper left of the screen.
*"Synthesis Kit" is required to synthesize equipment.
2: 2: Select the main item to attach Star Ability.
*You cannot select Avatar(Body) and Avatar(Additional).
*You can select the item whether it has Star Ability or not.
*You can select the equipped item.
3: Select the material.
*There are some conditions for the materials.
Condition 1: Avatar(Body) and Avatar(Additional) cannot be selected.
Condition 2: The items that don't have Star Ability cannot be selected.
Condition 3: The main item and material have to be the same category such as Sword, Bow, Rod, Claw, Armor, Additional Gear and Special.
Condition 4: You cannot select the material that has the same type and level of Star Ability as the main item.
Condition 5: Equipped items cannot be selected.
Example 1: If you set "Adventurer Garb" that doesn't have Star Ability, you can use "Iron Armor" that has Star Vitality Lv1.
Example 2: If you equip "Iron Armor" that has Star Vitality Lv1, it cannot be used as the material even if you set "Adventurer Garb" as the main item.
Example 3: If you set "Iron Armor" that has Star Vitality Lv1, you cannot use "Adventurer Garb" that doesn't have Star Ability as the material.
4: The result and success rate will be displayed.
*The result shows the Star Ability that will be transferred after succeeding in the attachment.
*The success rate varies according to the quality of the main item and the Star Ability Lv.
*The quality of weapons and armors is decided with ATK and DEF. The quality is higher as ATK and DEF are higher.
5: Select support items.
*You can attach Star Ability without support items.
*The types and effects of support items vary in Upgrading Star Ability and Attaching Star Ability.
*There are 2 types of support items for attachment: "Success Rate Up", "Quality Degrade Rate Down".
*"The selected support item" and "The support effect" will be displayed alternately in the support item section after you select the support item.
6: Tap "Synthesize" and "Yes" if the selected items are correct.
7: Star Ability will be transferred when you succeed in attachment.
*Unlike upgrading Star Ability, the items will not disappear even if you succeed in attachment.
*Star Ability will be transferred from the material to the main item when you succeed in attachment.
*If you fail in attaching Star Ability, the quality or Star Ability Lv can also be lowered.
*The quality will not be lowered if ATK and DEF of the items are the basic value(Quality: 0).
*Star Ability will not be lowered if the Star Ability is Lv1.
▼About Star Ability
■Question
About Star Ability
◆Answer
*The Star symbol will be shown in the game instead of the word "Star".
- Star Ability -
Star Ability can be attached on some equipment that drop from Boss Monster and Rare Monsters.
Examples of Star Ability
Name of Star Ability - Effect
Star Strength - STR increases.
Star Intelligence - INT increases.
Star Vitality - VIT increases.
Star Agility - AGI increases.
Star Dexterity - DEX increases.
Star Critical - CRT increases.
There are various Star Abilities other than above.
There are regularities for the Star Abilities attached on the equipment that drops from each Boss and Rare Monster.
Whether the ability is attached or not and the type of the abilities are at random.
Each Star Ability can be leveled up by "Equipment Synthesis".
- Star Ability Notes -
- Not all the equipment that are dropped from Boss Monsters and Rare Monsters have Star Abilities.
- The effects of Star Abilities are valid even if you equip on Accessories.
- The effects of Star Abilities can be lowered when you equip some items that have the same Star Ability.
▼About effective time for time limited items
■Question
What will happen to the effective time for time limited items?
◆Answer
The effective time will progress while you are logged out.
▼How do I change the Chat type?
■Question
How do I change the Chat type?
◆Answer
Flick your finger across the CHAT button located on the top right, to the left.
Chat type will appear at the type where you may switch to your desired chat style.
▼How do I control my Character?
■Question
How do I control my Character?
◆Answer
To move your character, use the circular icon in the lower left corner.
To change the viewpoint, move the mini map in the lower right hand corner.
▼How do I form a Party?
■Question
How do I form a Party?
◆Answer
Move to the same map as the person you would like to form a Party with.
MENU > Community > Target > Players Name > Invite to Party
An invitation will reach the player you have tapped.
A Party can be formed once invitation has been accepted.
You can only invite players when not currently part of a Party, and when you are the Party leader.
▼How do I leave or disband a Party?
■Question
How do I leave or disband a Party?
◆Answer
You can leave or disband a Party at any time.
MENU > Community > Party > Leave
When you are Party leader and would like to leave the party, you must disband the party. All party members, including yourself, will leave the party once disbanded.
▼How do I recover HP?
■Question
How do I recover HP?
◆Answer
To immediately recover HP use a recovery item, or recovery skill.
HP will also automatically recover while not in combat.
▼How do I save my game data?
■Question
How do I save my game data?
◆Answer
Your game will auto-save while playing.
To properly end the application,
MENU > Logout > End Application
▼How do I use an Emotion?
■Question
How do I use an Emotion?
◆Answer
You can set Emotion via Shortcuts. After you have them set, you can tap to use them freely.
MENU > Setting > Shortcuts
The Setting Shortcuts page will display.
Tap an empty shortcut button and choose from the listed emotions.
Emotions list
[Sit/Stand] [Bow] [Wave] [Happy] [Clap] [Salute] [Sad] [Angry] [Sulk] [Nod] [Think] [Search]
▼How to Control Group Chat
■Question
How to Control Group Chat
◆Answer
We would like to explain about "Group Chat" implemented after the scheduled maintenance today.
- How to Control Group Chat -
Once a chat room is created, the group chat screen will be displayed in the center of the screen.
The players who are in the room will be displayed on the right side of the screen.
Also, you can select "Invite to Group", "Group Settings" and "Leave" on the left side of the screen.
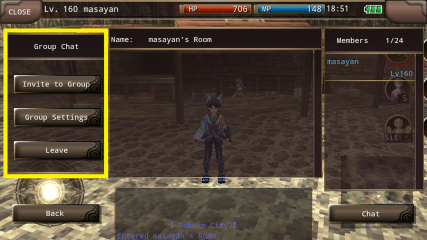
- Chatting in Group Chat -
Please tap "CHAT" button on the bottom right of the screen and enter words.
- Invitation Function in Group Chat -
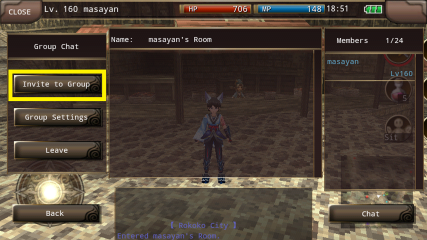
Tap "Invite to Group" and you can invite players from "Target", "Friend", "Guild", and "Party".
Please tap the player's name you want to invite and tap "Invite" to add the player to the group chat.
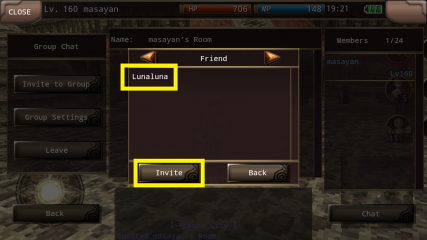
When you are in a group chat, you can "Invite to Group" from MENU > Community > "Guild", "Friend" and "Target" on the upper left of the screen.
If you are not in a group chat, you cannot use the command.
- Group Settings -
Only "Admin" can control the settings.
Please tap "Group Settings" to change the room settings.
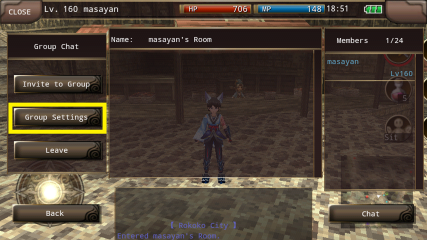
For details, please check "- Creating a Chat Room -" in "[OTHERS] Announcing Group Chat!".
- Community Functions in Group Chat -
Tap the player name from the list on the right side of the screen and you can use the community functions.
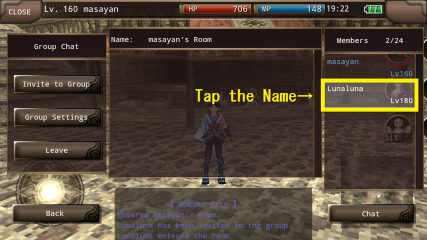
You can select a player by tapping the log in the chat screen.
It's useful when a lot of players are in the chat room.
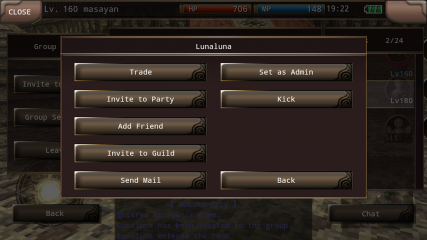
"Trade": You can send trade request to the player.
"Invite to Party": You can send a mail to invite the player to the party.
"Invite to Guild": You can send a mail to invite the player to the guild.
"Add Friend": You can send a mail to add the player as a friend.
"Send Mail": You can send a mail to the player.
"Kick": Only the admin can use this function. The admin can kick the player out of the group chat.
"Set as Admin": Only the admin can use this function. The admin can set the player as the admin.
When you are set as Admin, you can change the password.
- Leaving Room -
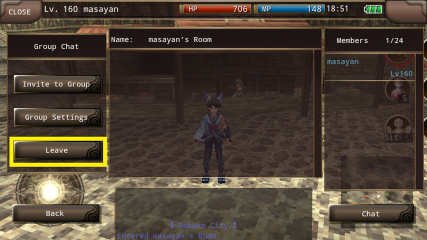
You can leave the room by tapping "Leave" button.
If the admin leaves the room, the player on the top of the list will automatically become the admin.
Therefore, the group chat will not be dissolved even if the admin leaves the room.
- Notes -
- Group chat will be dissolved only when all the players in the room leave the room. If you want to keep the group chat, at least 1 player has to stay in the room.
- You cannot enter the room if the maximum number of the players in the room reaches the limit or the password is changed when you try to enter the room.
In this case, please tap "Update" in the searching screen and update the list.
- If the maximum number of the players in the room is changed to the less number of players in the room, no one can enter the room until the number of players becomes less than the limit.
In this case, the players who are already in the room will not be kicked out.
- The level displayed in the group chat remains the same level when the player entered the room. The display of the level will not be updated.
- You will automatically leave the room by logging out from MENU > Log Out > To Title > End App.
- When the app ended by connection errors or other unexpected reasons, you will stay in the group chat for 5 minutes.
You can go back to the group chat by logging in within 5 minutes.
- When you are invited by the player who is in your blacklist, the invitation dialogue will not be displayed and the invitation will be automatically declined.
*You can invite the players who are in your blacklist to the group chat.
- You cannot use community function to the players who are in your blacklist.
*The controls that only Admin can use such as "Set as Master" and "Kick" can be used to the blacklisted players.
▼How to Take a Screenshot
■Question
How can I take a screenshot?
◆Answer
There are two ways to take a screenshot in your Android devices.
- Take a Screenshot (A)
1. Press "Back" button in your device after the character selection screen.
2. "Menu" button on the upper left of the screen and "Chat" button on the upper right of the screen turn to "Photo" buttons.
3. Press a "Photo" button.
4. Shown "Screenshot taken" and saved.
- Take a Screenshot (B)
1. Press "Camera" button on your device.
2. Shown "Screenshot taken" and saved.
*This instruction may not be applied for all android devices.
*"Photo" buttons will disappear in 0.5 seconds after pressing "Back" button in (A).
*If your device has no camera button, please try (A).
- Screenshot Settings from Shortcuts
Tap Menu > Shortcuts from the upper left of the screen and set "Screenshot" on the shortcuts.
--------------------------------------------------------------------------
- How to Confirm the Screenshot
The screenshot you took will be saved in "IrunaSS" folder in "Gallery" in your device.
However, the screenshot will not be displayed right after it is taken.
It will be displayed in "Gallery" following the directions below.
- Media Scan
1. Select Settings > Storage > Unmount SD card.
2. "Unmount SD card" will turn to "Mount SD card".
3. Select "Mount SD card" and remount the SD card.
- Reboot the Device
1. Hold the power button on the device.
2. The menu for the device will be displayed.
3. Select "Power off".
4. Hold the power button on the device again and turn on the device.
*This instruction may not be applied for all android devices.
*The section names may differ depending on the devices.
▼My skill level has gone up but there is no change in my skills effects.
■Question
My skill level has gone up but there is no change in my skills effects.
◆Answer
For Skill level effects to be reflected, you must set the Skill level.
Please check your current Skill Level via Shortcuts.
MENU > Setting > Shortcuts > Skill Level
Skill Level setting dialog will appear on the screen and you can adjust your skill levels.
▼New System 1: "Apostolia"
■Question
What is "Apostolia"?
◆Answer
- Apostolia -
You can raise the stats with "Apostolia" after completing "The Bandaged Girl and the Mysterious Warriors" in Episode 3.
Tap MENU > Character > Stats > Apostolia at the bottom left of the screen to use "Apostolia".
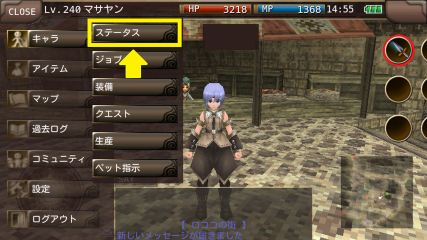
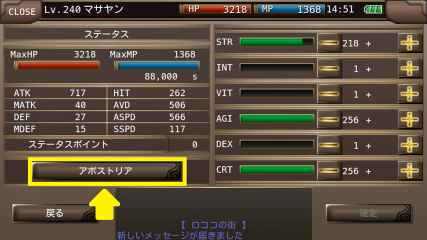
You can improve the stats by using "Stat Release", "Al Crysta", "Ignition" and "Special Stats" in "Apostolia".
▼New System 2: "Stat Release"
■Question
What is "Stat Release"?
◆Answer
- Stat Release -
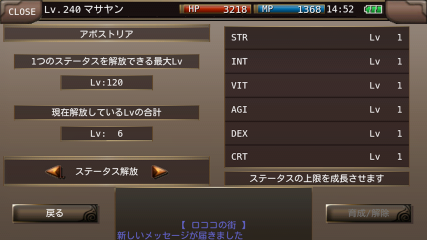
You can unlock the limit of the stats by raising Stat Lv.
As you raise Stat Lv, you can distribute stat points more than 256 (256+Stat Lv).
Even if you switch the Stat Lv, the Stat Lv that you have raised will not decrease.
- How to Unlock the Limit of Stats -
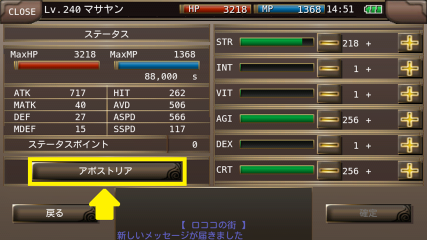
Tap "Apostolia" button in the bottom left of the stat screen.
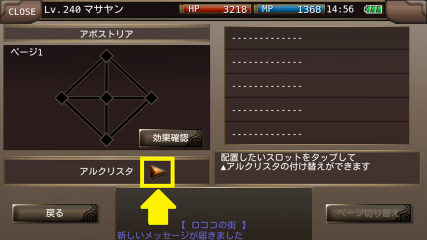
Tap the right arrow next to "Al Crysta".
Then, Stat Release screen will show up.
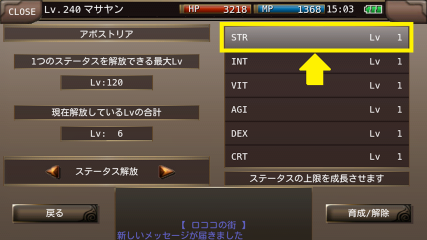
Select the stat that you want to unlock its limit.
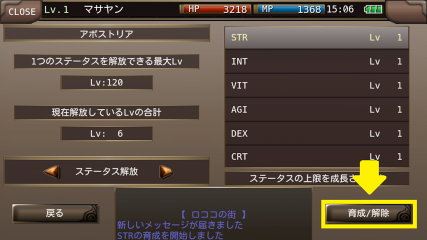
Tap "Raise/Quit" button and set the stat to "Raise" mode.
A part of Monster and Quest EXP will be allocated to the Stat Lv.
*Please note that Mission EXP will NOT be allocated to the Stat Lv.
- The Limit of Stat Lv -
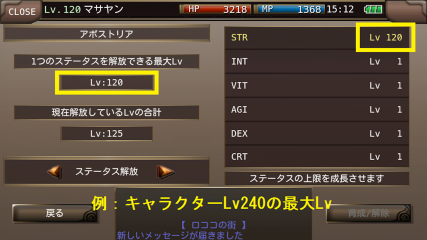
The limit of Stat Lv is the half of your character level.
*If the Stat Lv that you are raising is at max, the EXP for your character will not decrease.
- Stat Points -
You can earn "1 Stat Point" everytime you raise Stat Lv by 3.
- How to Stop Raising Stat Lv -
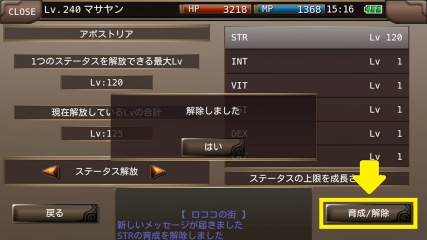
Tap the Stat Lv that you are raising.
Tap "Raise/Quit" button in the bottom right of the screen to stop raising the Stat Lv.
▼New System 3: "Al Crysta"
■Question
What is "Al Crysta"?
◆Answer
- Al Crysta -
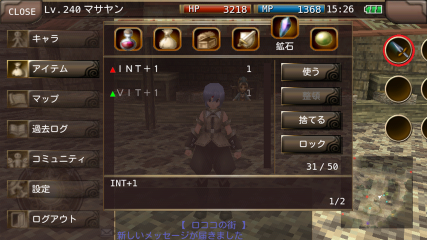
A new type of Crystas has been added after Episode 3.
Triangle icons are used for Al Crystas.
The crystas are not for the slots on weapons, armors and other equipment.
You can equip them in Al Crysta screen.
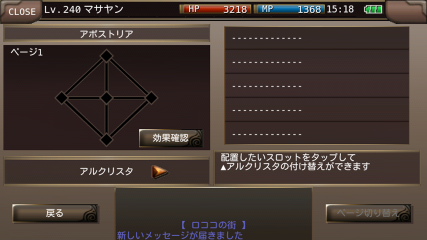
You can equip up to 5 Al Crystas but you cannot equip the same crystas.
- The Colors of Al Crysta -
There are 3 colors of Al Crysta: "Red", "Green" and "Blue".
The color of an Al Crysta is randomly decided when the monster drops it.
When you equip an Al Crysta next to another Al Crysta, "Color Bonus" will be activated.
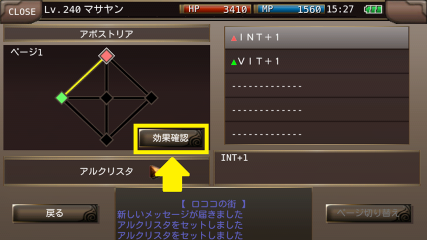
You can confirm the color bonus effects by tapping "Effects" button.
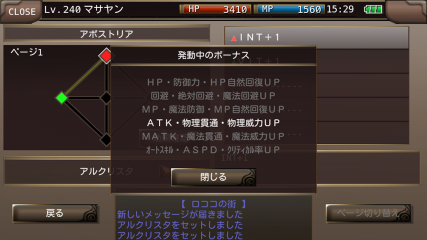
Example:
Red + Green = Yellow (Increases ATK, Melee and Melee pierce damage)
▼New System 4: "Ignition"
■Question
What is "Ignition"?
◆Answer
- Ignition -
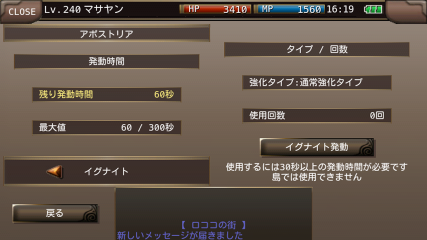
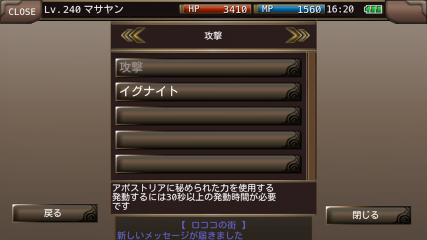
You can use "Ignition" from the short cut buttons.
When you use "Ignition", your stats will increase for a few seconds.
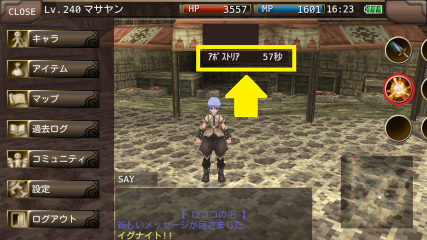
The more you use "Ignition", the longer its duration gets.
- Cooldown of Ignition -
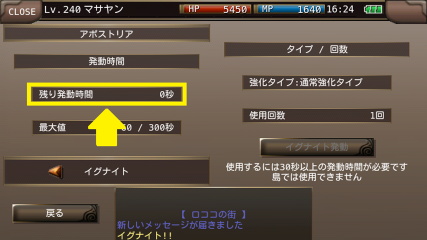
The duration will be recharged little by little with time.
You need to recharge at least 30 seconds for the duration to use Ignition again.
*The duration will be recharged even if you are logging out.
- Boost Type -
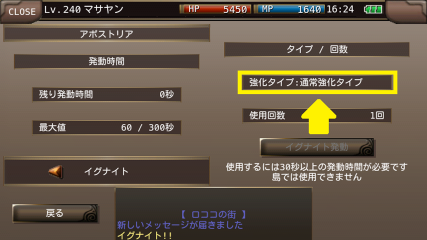
"Boost Type" depends on the weapon you are using when you use "Ignition".
If you equip a sword and use Ignition several times, "Boost Type" will become "Sword".
If you want to change "Boost Type", equip another type of weapons and use Ignition a few times.
- Switching Pages in Al Crysta Screen -
The page to equip Al Crystas will increase if you use Ignition a fixed number of times.
You can equip Al Crystas in each page.
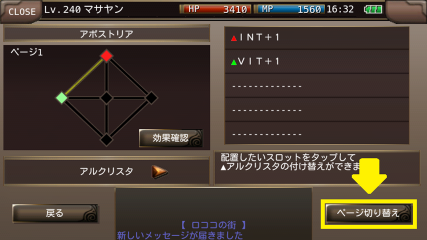
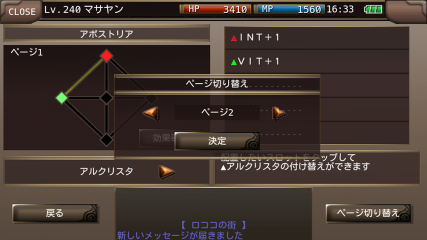
Tap "Switch Page" in the bottom right of Al Crysta screen to switch the page.
*You cannot edit the page name.
- How to Utilize "Switch Page" -
When another page is added, we recommend that you edit each page according to the purpose of use.
For instance, equip Al Crystas for boss battles in page 1, and equip Al Crystas for collecting items in page 2.
You can easily change the Al Crysta effects by switching the page.
Let's make best use of the new systems with "Switch Page"!
▼New System 5: "Special Stats"
■Question
What are "Special Stats"?
◆Answer
- Special Stats -
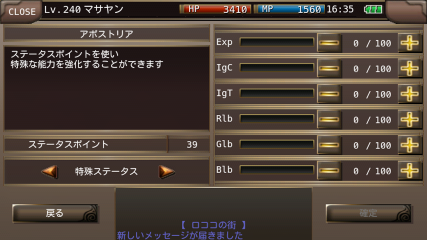
You can allocate stat points into special stats after the release of "Apostolia".
Please refer to the following for the effects of Special Stats.
EXP: Increases EXP gain.
IgR: Increases the duration recovery speed of Ignition.
IgT: Increases the duration of Ignition.
RD: Boosts the effects of Red, Yellow and Purple lines between Al Crystas.
GR: Boosts the effects of Green, Aqua and Yellow lines between Al Crystas.
BL: Boosts the effects of Blue, Purple and Aqua lines between Al Crystas.
You can allocate up to 100 stat points into each Special Stat.
*You can reset the stat points allocated into Special Stats by using "Stefly's Book".
▼Please tell me about the ticket effects.
■Question
Please tell me about the ticket effects.
◆Answer
The drop rate effect will be applied when you defeat ANY monsters.
The EXP gain effect will NOT be applied to mission and quest EXP.
▼What are Shortcuts?
■Question
What are Shortcuts?
◆Answer
You can use shortcuts during battle for things such as attacks or items by tapping the circular buttons on the right.
MENU (Upper left) > Setting > Shortcuts
Shortcut settings will display.
▼What are each of Parameters details?
■Question
What are each of Parameters details?
◆Answer
Refer to parameter details below.
ATK(Attack)
Melee attack
MATK(Magic attack)
Magic attack
DEF(Defense)
Melee defense
MDEF(Magic defense)
Magic defense
HIT
Accuracy of melee attack
EVA(Evasion)
Evasion of melee attack
The higher the value, there is a higher chance to evade attack.
ASPD(Attack speed)
Speed of melee attack
This value is the speed of melee attack.
CSPD(Cast speed)
The speed of casting magic
This value is the speed of casting magic.
▼What are each of the status roles?
■Question
What are each of the status roles?
◆Answer
Refer to the status roles below.
STR: affects the power of physical attacks
INT: affects the power of magic attacks and MP
VIT: affects the strength of defense and HP
AGI: affects chance of evading and speed of attack
DEX: affects attack accuracy and the speed of casting magic
CRT: affects chances of making a critical hit
▼What is "Hate"?
■Question
What is "Hate"?
◆Answer
The objective probability you are to monsters.
-More Hate = Higher objective of monsters
-Less Hate = Lesser objective of monsters
To increase your Hate, try the following.
-Give damage to monsters
-Use the Skill "Provoke"
-Use Revive on your party members, etc.
Depending on your skills, you may be able to receive more hate than normal.
e.g. Skill: Provoke
▼What is Group Chat?
■Question
What is Group Chat?
◆Answer
- Group Chat -
"Group Chat" is a new feature that you can create a chat room and chat with 24 players at max.

If you create and enter the chat room, you can share the chat with other players while you are moving.
You can also use group chat in the islands.
- How to Enter Group Chat and Create a Room -
- Tap MENU > Community > Group Chat from the upper left of the screen or slide "CHAT" on the upper right of the screen and tap "GROUP".
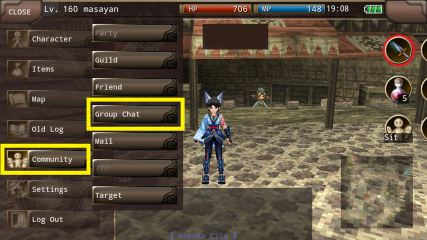
You can use group chat from MENU > Normal Menu > Community > Group Chat in the island.
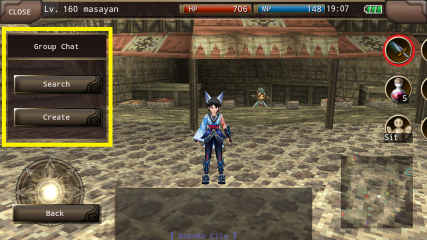
- "Search" and "Create" will be displayed in Group Chat Menu.
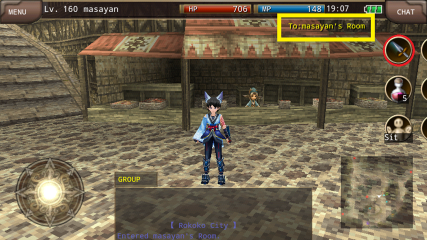
When you tap "GROUP" button while you are in a group chat, "To:
will be displayed in the upper left of the screen.
You can switch on and off whether you display the room name from system settings "Display GROUP/TELL Name".
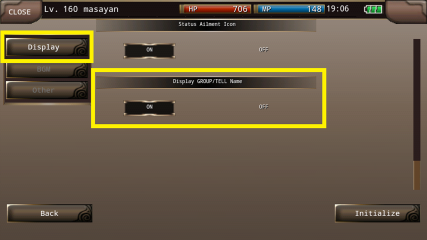
- How to Search Group Chat -
"Search" button: You can search other players' group chat and enter the room.
Please select "Category" and "Password", and tap "Start Search" when you search the group chats.
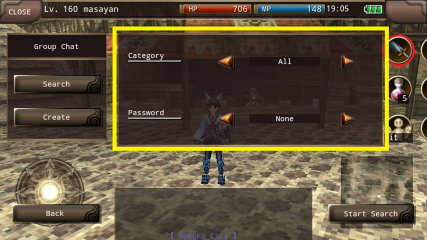
When you search the group chats, only the chat rooms that meet the conditions you set will be displayed.
Tap the room and you can enter the room.
- Categories for Searching -
You can select "All", "Conversation", "Seek Party", "Trade", and "Seek Guild".
- Types of Password -
"None": Search the rooms that don't require the password.
"Required": Search the rooms that require the password.
"Both": Search the rooms that hit both "None" and "Required".
- Creating a Chat Room -
"Create" button: You can create a chat room for group chat.
You are required to set "Name", "Category", "Password", and "Max Players".
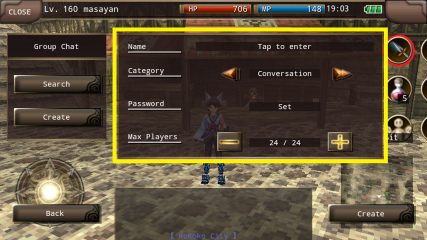
After confirming the settings, please tap "Create" at the bottom right of the screen to create the room.
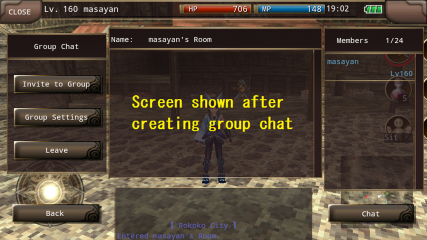
The player who created the room will become "Admin" and can control the functions to invite players to the room.
- About Settings -
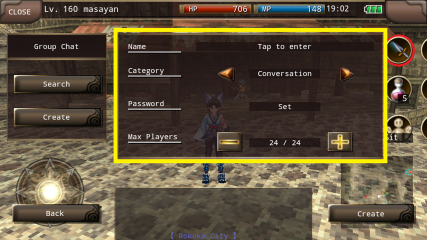
"Name": The maximum number of letters is 16. If you set it blank, it will automatically become "[Character's Name]'s Room".
"Category": You can select from "Conversation", "Seek Party", "Trade", and "Seek Guild". They will be used for searching the room.
"Password": You can set up four-digit password. If you don't set the password, the room will not require the password.
"Max Players": You can set the maximum number of players in the room. Please tap the number and directly enter the number or use "+" and "-" buttons.
▼What is a Blacklist?
■Question
What is a Blacklist?
◆Answer
'-To put players in Blacklist, specified players speaking will not reach to you.
-Friend, Party and Guild Invitation from players in Blacklist will be automatically refused.
-You can't invite them to Friend, Party, and Guild.
*Blacklist Apply Step
1. MENU > Community > Target
2. Select player from Target list
3. Select [Add to Blacklist] in Target Command
4. Select [Yes]
5. Complete to add to Blacklist.
-Players name in Blacklist will be displayed in red.
*Blacklist Remove Step
MENU > Settings > Blacklist
Select [Delete]
▼What is a Chat Filter?
■Question
What is a Chat Filter?
◆Answer
Chat that has been filtered will not be shown in the window.
How to set the Chat Filter
1. MENU > Setting > Filter
2. Select type of filter.
Letters will become gray and shown as "Hidden."
Press initialize, located at the bottom right of the screen to remove all Chat Filters.
* Chat types that can be hidden
-Say
-Shout
-Tell
-Party
-Guild
-Trade
-Battle Log
*Items obtained will be shown Battle Log is hidden.


